
The Engineer is a man driven by more than mere eccentricity. Once a humble, hard-drinking builder in the Legion, he came to master all manner of machines. Wielding a blunderbuss of his own design, hoisting ale and a veritable armory on his back, he is a strange but impressive sight on the battlefield.
Base Attack
Attack Type: RangedAttack Damage: 37-50
Attack Range: 500
Attack/Sec: .71
Detailed Attributes
Movement Speed: 295
Strength per level: 2.3
Agility per level: 2.3
Intelligence per level: 1.8
Defense Information
Armor: 3.6
Dmg. Reduction: 18%
Magic Armor: 5.5
Magic Reduction: 25%
| Table of Contents | ||||||||||||||||||||||||
| Introduction | ||||||||||||||||||||||||
| Spells | ||||||||||||||||||||||||
| Laning and Gameplay | ||||||||||||||||||||||||
| Team Fights | ||||||||||||||||||||||||
| Skill build | ||||||||||||||||||||||||
| Items | ||||||||||||||||||||||||
| Tips and Tricks | ||||||||||||||||||||||||
Primary Attribute: Agility
Role: Semi-carry/Ganker/Initiation
Strength: 20
Agility: 20
Intelligence: 21
Engineer
The Engineer is a powerful hero who can carry and support his team very well. Because of the size and power of his ultimate, Energy Field, teams can easily synergize the Engineer to trap heroes. As a hero who can play almost any role, the Engineer is played in a number of ways which makes him fun to play and watch.
Range: 800
Radius: 700
Mana Cost: 100
Cooldown: 22 seconds
Activation
Creates a Steam Turret at the target position facing the vector direction. Fires 5 shots a second for 5 seconds in an 800 distance and a 400 radius cone.
Bullets hit all enemies they come in contact with, dealing 25/40/55/70 Physical damage, pushing them 25 units away from the Turret, and applying a stacking 7% movement slow.
Max slow is 5 stacks or 35% movement.
Any single target can only take damage from 5 bullets max and the turret dies in 3 hits.
Strategy: Use this ability, and then click and hold a place on the ground and point where you want the turret to fire. Steam Turret has a pushback and slow. If placed well it can put the enemy in a tough spot.
 TinkerThe Engineer can easily manipulate the inner workings of any Mechanical unit or Tower, Tinkering with them to either increase or decrease their function for a short time.
Range: 450
Cast Time: 1 second
Mana Cost: 50
Cooldown: 20 seconds
Activation
Passively decreases the cooldown and mana cost of The Keg by 7 / 14 / 21 / 28%.
On use, it boosts mechanical units for 15 seconds in the following ways depending if the target is allied or enemy:
Towers: ±10/20/30/40 Attack Speed ±3/5/7/9 Armor
Siege: ±10/20/30/40 Attack Speed ±20/40/60/80
-66% damage taken (if allied)
If used on an enemy siege, it destroys it after the debuff expires, dealing 50/75/100/125 magic damage in 600 radius around the target.
Strategy: Usable on towers or catapults. This ability is very good for pushing towers down and the passive buffs to Keg are an added bonus. It's sometimes picked up early for pushing strategies.
 Energy Field
The Engineer can guarantee that any enemies who enters or exits the active field are purged of all buffs and then silenced and perplexed for a short amount of time.The Engineer is a powerful hero who can carry and support his team very well. Because of the size and power of his ultimate, Energy Field, teams can easily synergize the Engineer to trap heroes. As a hero who can play almost any role, the Engineer is played in a number of ways which makes him fun to play and watch.
Engineer's Role
The Engineer can master a number of different roles because his abilities allow him to fit into what his team needs. Whichever role the Engineer chooses, he can always throw down a burst of damage and a decent movement slow with his Turret, making him a great ganker. His Energy Field is good for both defense and offense and makes for great initiation. The Engineer is one of the few heroes who has both a stun and a movement slowing effect, making him a huge disruption in the opposing team.
 Steam Turret
Deploying at the place of his choosing in any direction he wants, it lays down waves of suppressing fire that slow enemies who stay in the cone.The Engineer can master a number of different roles because his abilities allow him to fit into what his team needs. Whichever role the Engineer chooses, he can always throw down a burst of damage and a decent movement slow with his Turret, making him a great ganker. His Energy Field is good for both defense and offense and makes for great initiation. The Engineer is one of the few heroes who has both a stun and a movement slowing effect, making him a huge disruption in the opposing team.
Range: 800
Radius: 700
Mana Cost: 100
Cooldown: 22 seconds
Activation
Creates a Steam Turret at the target position facing the vector direction. Fires 5 shots a second for 5 seconds in an 800 distance and a 400 radius cone.
Bullets hit all enemies they come in contact with, dealing 25/40/55/70 Physical damage, pushing them 25 units away from the Turret, and applying a stacking 7% movement slow.
Max slow is 5 stacks or 35% movement.
Any single target can only take damage from 5 bullets max and the turret dies in 3 hits.
Strategy: Use this ability, and then click and hold a place on the ground and point where you want the turret to fire. Steam Turret has a pushback and slow. If placed well it can put the enemy in a tough spot.
Range: 450
Cast Time: 1 second
Mana Cost: 50
Cooldown: 20 seconds
Activation
Passively decreases the cooldown and mana cost of The Keg by 7 / 14 / 21 / 28%.
On use, it boosts mechanical units for 15 seconds in the following ways depending if the target is allied or enemy:
Towers: ±10/20/30/40 Attack Speed ±3/5/7/9 Armor
Siege: ±10/20/30/40 Attack Speed ±20/40/60/80
-66% damage taken (if allied)
If used on an enemy siege, it destroys it after the debuff expires, dealing 50/75/100/125 magic damage in 600 radius around the target.
Strategy: Usable on towers or catapults. This ability is very good for pushing towers down and the passive buffs to Keg are an added bonus. It's sometimes picked up early for pushing strategies.
Radius: 475
Cast Time: 1 second
Mana Cost: 200
Cooldown: 85 seconds
Activation
Places a gadget at the Engineer's location that lasts 6 / 8 / 10 seconds, takes 4 hits to kill, and creates an Energy Field in a 475 radius around itself.
Any enemy who enters or exits the Energy Field is dispelled, takes 100 damage and Energy Field is applied to them for 2 seconds. While inside the bounds of the Energy Field, they take 3 / 5 / 7% of their max health per second in Magic damage.
Strategy: This ultimate deals a ton of damage at any point in the game because it is percentage based. When you leave/enter you are purged (slows and removes buffs), silenced (unable to cast spells), and perplexed (unable to use items) for 2 seconds.
The Engineer can fit in almost every type of lane with the exception being Jungle. The Engineer can solo lanes, but there are better options. In a pinch, the Engineer can do an okay job solo, but I wouldn't expect anything amazing. It fits much better into a dual-lane or tri-lane. The Engineer's Turret does a huge amount of damage early if placed well, and an easy way to ensure turret hits is by laning with stuns or slows.
Potential Laning Partners


Laning Phase
The Engineer should be taking the last hits in any lane that he is in. If the Engineer is in a dual-lane he should be paired with a support/ganker-type hero. By laning this way you allow the Engineer to get some needed farm and kill heroes early in the game. In lanes where there is a strong tower push, it is useful to pick up Tinker earlier then usual over Keg.
Mid-Game
The Engineer should be clearing creep waves and creep spawn stacks with his Turret to boost his farm. You are going to want to take out some early towers by utilizing your Tinker ability which will allow for better map control and quick money. Ganking is a must on the Engineer, usually with backup, because Energy Field slows escapes along with Keg and Turret sealing the deal.
Late Game
By this point you need to have your portal key which will allow the Engineer to initiate and move around quickly. Turret still does a good amount of slow and damage and Energy Field scales really well late game as it is percentage based. The Engineer rarely carries a game by himself but he can make it extremely simple for other heroes to come in and mop up your opponents.
For the Engineer to have an effective ultimate he has to travel to the center of the battle and trap as many people as he can. By doing this, he is often the first target so it is ideal for the Engineer to build some survivability, otherwise known as a "tank"-build.
Team Synergy and the Engineer
A team with the Engineer isn't concerned with single target damage, instead they will focus on blowing people up in the Engineer's Energy Field. Two things can make the Engineer's ultimate very effective: the first is stuns, preferably AoE. The second thing is AoE damage and some way to finish them off. If you have a Behemoth, Plague Rider, and an Engineer ultimate on top of 5 heroes the damage output will just be too high while stunned for them to counter. What you don't want is to allow the enemy time to kill your Energy Field as it will go down in a second when focused. You'll want to distract them by directing them to heroes who appear to be doing more damage. You want them to focus heroes over Energy Field because it separates their team, and if they want to help someone outside or inside they must first be impaired for 2 seconds. Be careful of Defiler, her ultimate can kill Energy Field almost instantly.
The Engineer fits very well into a push team because his Turret and Tinker abilities allow him to quickly push the lane. When you have an Engineer on your team you must take towers fairly early in the game.
 Turret
 Keg Energy Field/Keg
 Tinker
 Energy Field Tinker Tinker Tinker
 Stats Energy Field
Steam Turret should be your level 1 move. Keg has a nice stun, but at level 1 it has a short duration and low damage. Steam Turret on the other hand can do 100 damage at level 1 to multiple targets and can slow them all for 5 seconds. After that just switch off Keg and Turret. At level 6 you may be having mana problems because the Engineer has fairly low base mana and his ultimate costs 200. It is okay to skip Energy Field and pick it up at level 9 since its duration and damage aren't great at level 1. Pick up Tinker/Energy Field when available afterward. Tinker is a very good pushing ability, do not skip it. The images on the right represent what I build.
Starting items
2x
 2x
2x 1x
1x 1x
1x
Alternate Builds
3x
2x3x
5x3x
1x 1x 1x
1xYou'll want some stats to improve your last hitting ability and health regen to stay in the lane.
First Items to get

 Or
Or 
Mana Battery is a solid pick up on any hero and it turns into Power Supply which is great for heroes, such as the Engineer, who have a small mana pool but relatively low mana cost abilities. The Engineer can use either Ghost Marchers or Steamboots effectively so it becomes a matter of preference. Pick up Ghost Marchers if you feel you need speed or Steamboots when you think the enemy damage output is high.

An optional early pickup, useful on many heroes. Very cheap and very effective.
Mid-Game Items
Every Game. Portal Key is a solid early game or late mid-game pickup.


Good early game pickups - sell later. Only 1 of each if any.


An awesome yet under-appreciated item. Practically made for the Engineer.

A useful item to grab early, later turns into Null Stone.

Late Game Items
The Engineer needs one of these every game. Good survivability.


If your opponents have high physical damage, pick this up for your team.

Carry items - Not core on the Engineer but he can build this way.


Situational Items
Pick up against invisible teams

A useful purge (debuff and slow). Good for ganking, especially solo.

Tips and Tricks with the Engineer
The Keg
Multiple Uses of Keg
The most useful part of Keg is its knockback ability which can be used in a number of ways. The most obvious way is to push enemies back or forward followed by a stun. The other way to use its knockback is to hit yourself with the Keg and push yourself back or forward. If a melee hero is chasing you, place your Keg in between you, hitting the enemy and yourself and creating a huge gap to get away. The Keg will also destroy trees.
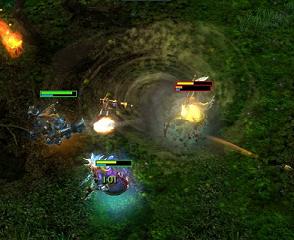
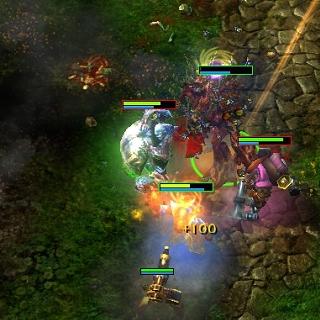
In the image we see in the top left the aftermath of a Keg toss, stunning both Pyromancer and Keeper of the Forest. Pestilence comes and throws his Swarm onto the Keeper, ensuring his death as it amplifies Turret damage. The Turret is placed so that it hits both heroes with the first 5 shots. Comboing your Keg stun with a Turret is an effective way to kill heroes but the pushback of Keg makes it difficult.
There is no cast time
There is an animation for the Keg stun but the spell is instant cast. It still takes 1 second for the keg to land. When using this spell treat it as instant cast, use it and move instantly. Watching the animation is a waste of time.
Steam Turret
Comboing Steam Turret
Steam Turret is a tricky spell to place. If you throw it down in the wrong spot the enemy can avoid it or move out of it before it can be put to use. To prevent this combo your Turret with stun or slow abilities. Your Keg stun is the most obvious stun to make use of but it can be hard because the pushback may not go where you want it to. Combos with other heroes like Electrician ensures a quick death.
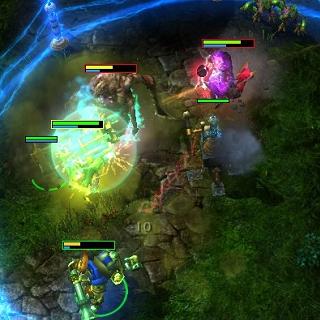
In the image the Turret could have been placed anywhere around Devourer and it would have had the same effect. The reason it is shooting at that angle is to include Corrupted Disciple in the list of the dead.
Physical Damage
Its easy to overlook what type of damage certain spells do. Steam Turret does physical damage, and quite a lot of it. An Andromeda that maxes Aurora first can be a deadly combination. It is also useful to note what other heroes and abilities benefit your Turret: Soulstealer's Dread, Demented Shaman's Storm Cloud, Armadon's Snot, Deadwood's Rotten Grasp, and Panda's Flick, as well as heroes who carry Demonic Breastplate or Shieldbreaker.
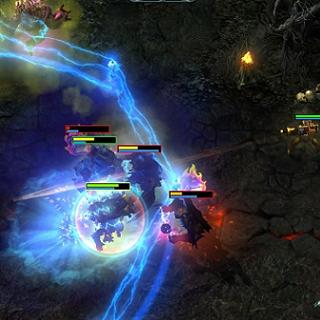
In the screenshot to the right Turret is being used with the Engineer's Energy Field to push them back in, essentially trapping two of them and seriously disabling a third. Engineer should always use his Turret with his ultimate to either push heroes in or out while hitting as many as possible.
Tinker
Tinker can be used defensively and offensively in pushes and should be picked up over stats. The passive bonus to Keg is good but not enough to justify an early pick up. Tinker makes the Engineer an effective hero in push strategies.
Using Tinker on Catapults
There are very few instances where using Tinker on catapults is worth it. There are no benefits to nerfing the damage output of the catapult. It can't even be used to clear a creep wave because it takes 15 seconds for the catapult to blow up and the Engineer's Turret kills it in 2 seconds. The only application of this would be if you are backing from a lane and Turret is on cooldown.
Energy Field
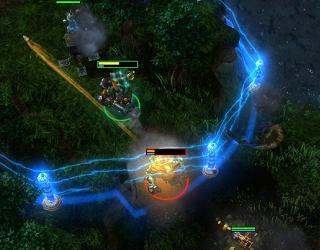
Fight at Choke Points
Energy Field is a great ultimate for confined areas where the enemy will be forced to stay in it or move out of it from one exit making it easy for your team to kill them. Portal key is an easy way to place your ultimate well but not entirely necessary.
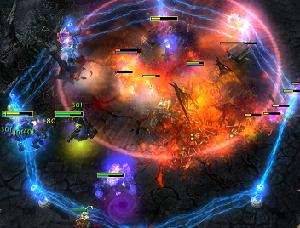
On the right the Engineer placed himself inside a confined area while the Hellbourne entered Legion's forest. Tempest uses Portal Key and casts his ultimate while Engineer does his right on top of that, forcing the Hellbourne to quickly drop and fall back. Because of their position they only have one exit where they will be grouped up and slowed where the Legion can quickly dispose of them.
Dividing their Team
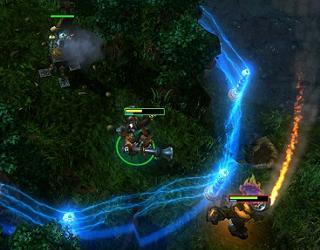
Sometimes you won't want to or are unable to put all 5 enemy heroes in your ultimate, in which case you should attempt to separate their team. Once you the team is divided they will be in complete chaos, running in to try to save teammates, and others run out, which makes for easy pickings.
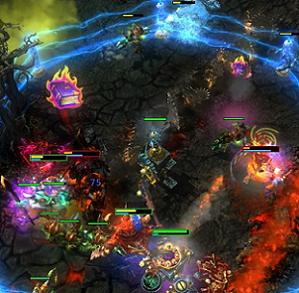
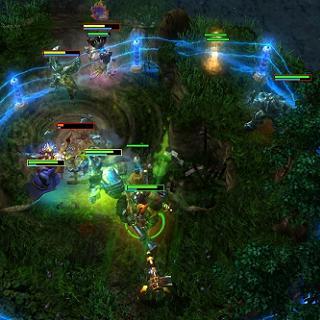
On the right the Engineer divided their team, 2 heroes on one side, 1 stuck inside on one side and 2 others on the far end of the Energy Field. His team quickly took out the 3 stuck on the bottom while the Engineer used his Turret and Keg to stop the others from helping, resulting in a genocide and concede.
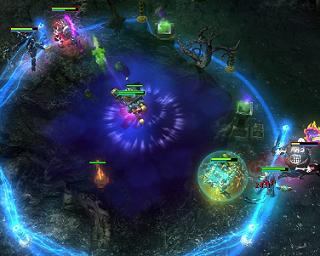
Putting it All Together
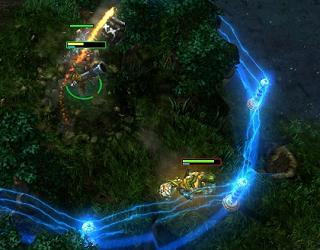
Once you master combo-ing the Engineer's spells you can quickly burst an enemy from full to dead. In the above images we see Pebbles trying to make a getaway, so the Engineer uses his Energy Field and throws his Keg out very early. Engineer predicted where Pebbles would be and in the second screenshot we see that the Keg landed right in front of Pebbles, pushing him back into the Energy Field. He then constructs his Turret shooting inside at Pebbles forcing him in and out of the Energy Field. Pebbles went from full health to none in under five seconds.
Pebbles then proceeded to ragequit.
Comments will only be allowed if they are directly relevant to the actual strategy in the article.